If you store images in regular folders instead of Apple Photos, you've probably noticed something frustrating: Apple's built-in duplicate detection doesn't help you. It only works inside the Photos library.
Meanwhile, your Downloads folder has three copies of the same screenshot. Your design assets folder has duplicates from multiple exports. Your project directories are cluttered with images you've copied, renamed, and forgotten about.
This guide covers practical ways to find duplicate photos in folders on Mac—whether you're cleaning up Downloads, organizing design assets, or finally tackling that Screenshots folder that's been growing for years.
Quick Summary
- Apple Photos duplicates feature only works inside the Photos library—useless for folder-based workflows
- Manual Finder sorting works for obvious duplicates but misses renamed files and similar images
- Dedicated tools can scan folders recursively and detect both exact and near-duplicate images
- Best practice: Move duplicates to a quarantine folder first, review, then delete
Why Apple Photos Duplicates Detection Doesn't Help
macOS Ventura introduced a "Duplicates" album in Apple Photos. It's a welcome feature—but it has a fundamental limitation.
It only works for images imported into your Photos library.
If you're a designer with project folders, a developer with screenshot collections, or anyone who organizes images in Finder rather than Photos, this feature is irrelevant. Your workflow looks like this:
- Screenshots land in
~/Desktopor a custom Screenshots folder - Design exports go into project directories
- Downloaded images accumulate in
~/Downloads - Client assets live in organized folder structures
None of these touch Apple Photos. None of them benefit from Apple's duplicate detection.
You need a solution that works with folders and subfolders—not a photo library.
4 Ways to Find Duplicate Images in Folders on Mac
Method 1: Manual Finder Sorting
The simplest approach is sorting files in Finder by name, size, or date.
How it works:
- Open a folder in Finder
- Switch to List view (⌘+2)
- Sort by Size or Date Modified
- Look for files with identical sizes or timestamps
Limitations:
- Doesn't work across subfolders (Finder doesn't show nested contents in one view)
- Misses renamed duplicates (
image.pngvsimage-copy.pngvsIMG_1234.png) - Can't detect visually similar images that differ by a few pixels
- Tedious for folders with hundreds of files
Verdict: Works for small folders with obviously named duplicates. Falls apart quickly at scale.
Method 2: Quick Look and Preview Comparison
When you suspect two images are duplicates, you can compare them manually.
How it works:
- Select multiple images in Finder
- Press Space to open Quick Look
- Use arrow keys to flip between them
- Compare visually
Limitations:
- Requires you to already know which files to compare
- No way to systematically check hundreds of images
- Doesn't tell you if files are byte-for-byte identical or just similar
- Time-consuming for large collections
Verdict: Useful for spot-checking, not for systematic duplicate finding.
Method 3: Dedicated Duplicate Finder Apps
Several categories of apps specialize in finding duplicate files:
- General duplicate finders: Scan any file type based on hash or content
- Photo-focused tools: Specialize in images with visual comparison
- Command-line utilities: Tools like
fdupesfor terminal users
What to look for:
- Recursive folder scanning (checks subfolders)
- Hash-based detection (finds exact duplicates even if renamed)
- Visual/perceptual comparison (finds similar but not identical images)
- Preview before deletion (critical for avoiding mistakes)
- Local processing (no cloud uploads for privacy)
Limitations vary by tool:
- Some require importing files into a library
- Some only detect exact duplicates, missing near-duplicates
- Some upload images to cloud services for processing
- Many lack good visual comparison interfaces
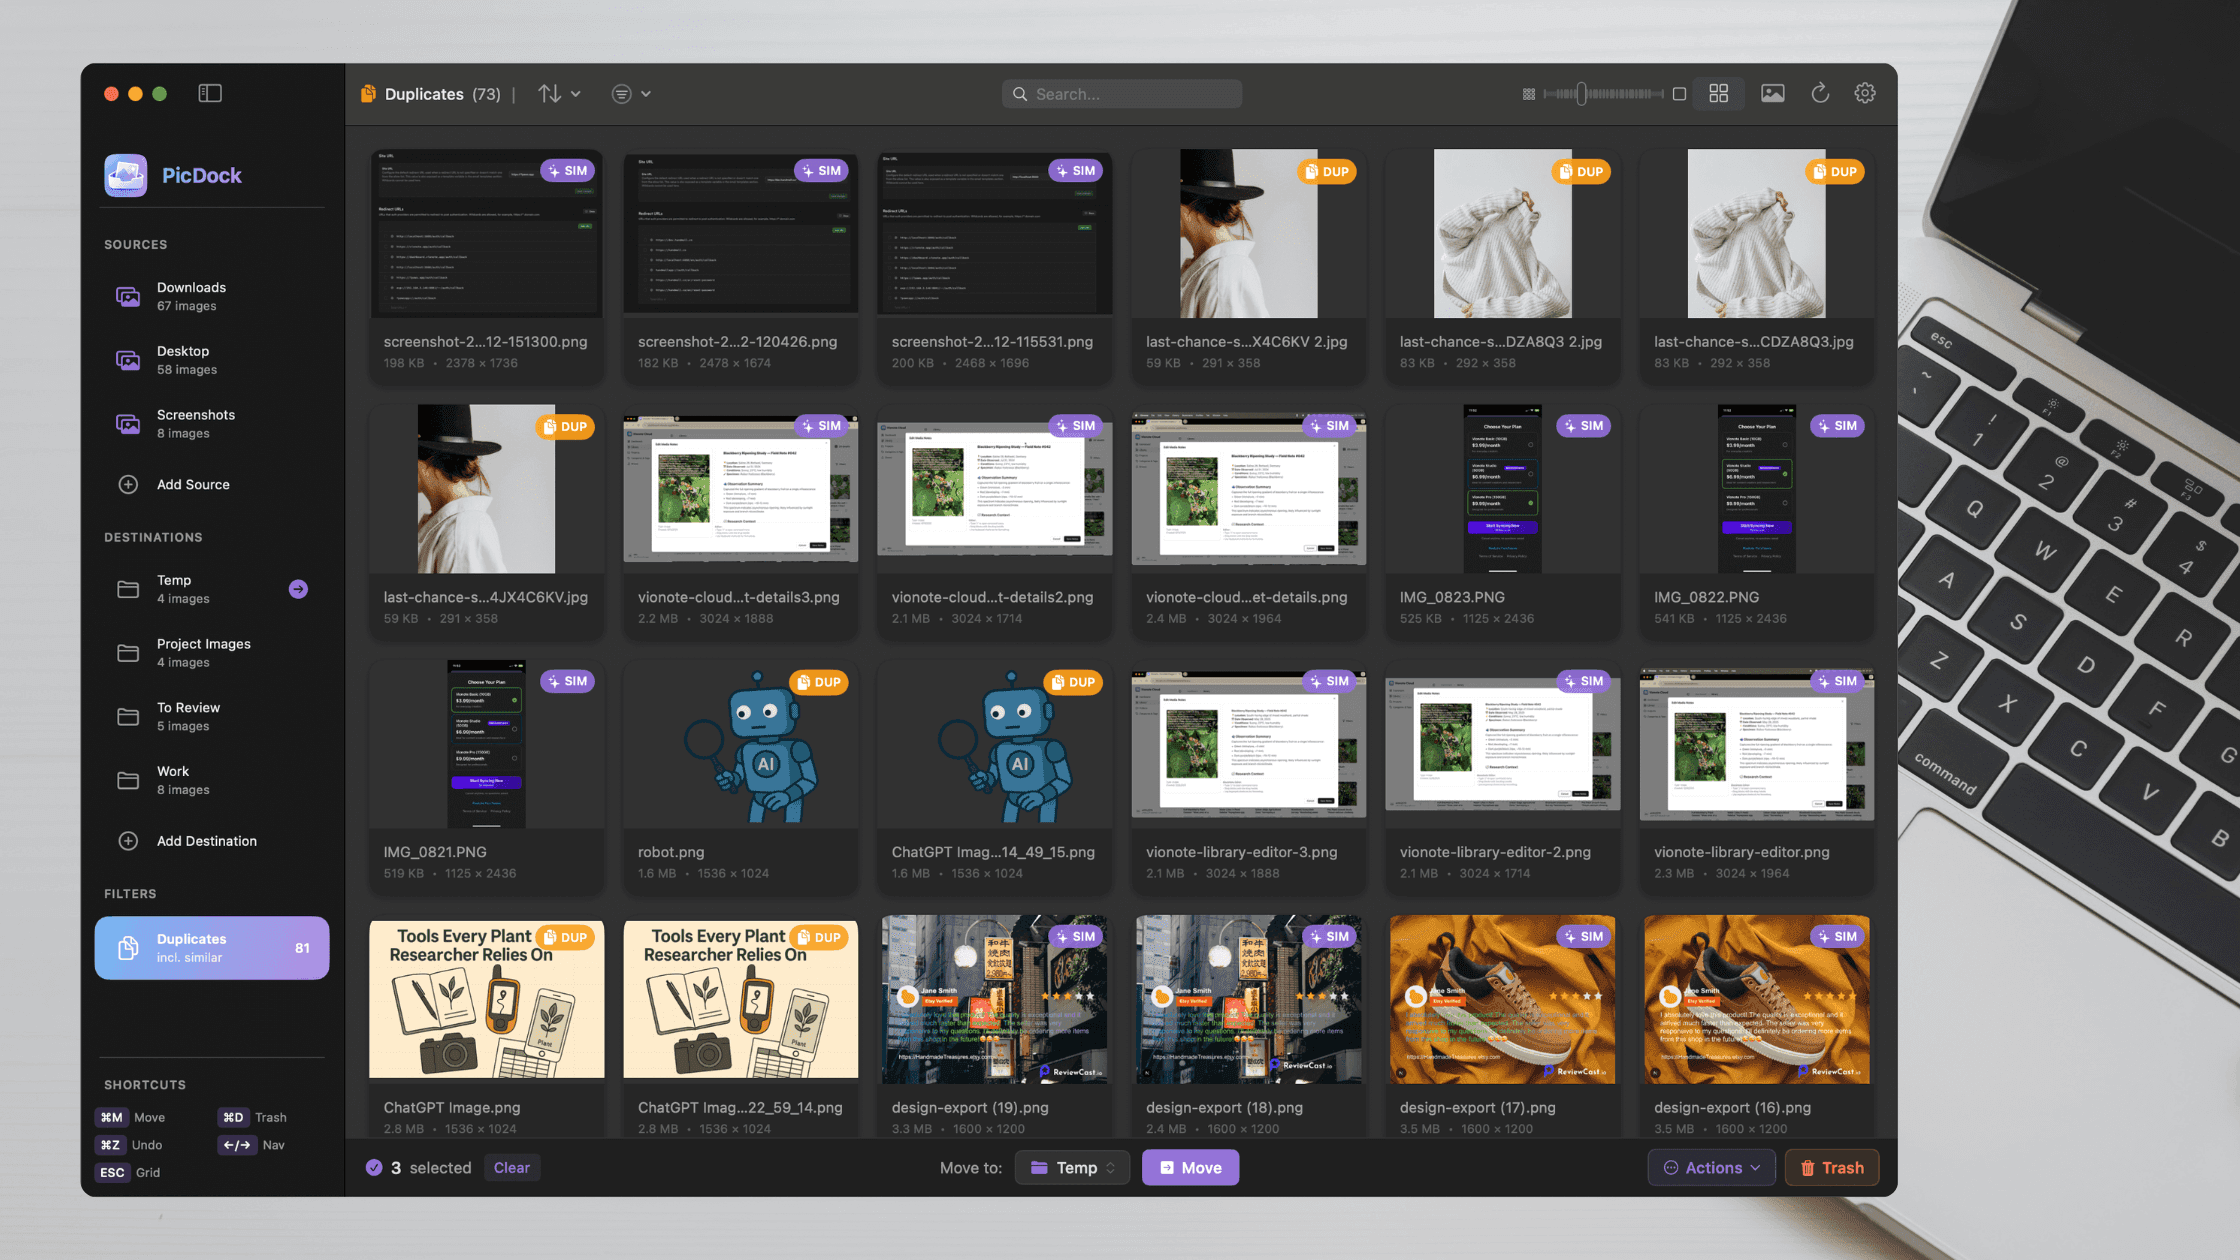
Method 4: PicDock Workflow
PicDock approaches this differently. Instead of being a "duplicate finder" that you run once, it's an image browser with duplicate detection built into the workflow.
How it works:
- Point it at any folder: No import, no library creation. Just select a source folder.
- Enable recursive scanning: See all images in subfolders in one unified grid.
- Automatic duplicate detection: PicDock computes SHA-256 hashes to identify exact duplicates and optional perceptual hashes for near-duplicates.
- Filter to show duplicates: One click to see only duplicate images.
- Visual comparison: Large previews and side-by-side viewing to confirm before action.
- Move, don't delete: Send duplicates to a destination folder (quarantine) rather than immediately trashing.
Key advantages:
- Works with folders: No library to manage. Point, scan, done.
- Handles subfolders: Recursive scanning shows everything in one view.
- Detects renamed duplicates: Hash-based matching ignores filenames.
- Near-duplicate detection: Finds visually similar images, not just byte-identical ones.
- Safe workflow: Move to quarantine folder first, review, then delete later.
- 100% local: All processing happens on your Mac. No cloud uploads, no privacy concerns.
- Fast browsing: Scroll through thousands of images without lag (see our post on image browser performance).
Step-by-Step: Find and Remove Duplicates Safely
Here's a workflow that minimizes the risk of accidentally deleting originals.
Step 1: Create a Quarantine Folder
Before you start, create a dedicated folder for suspected duplicates:
~/Desktop/Duplicates-Review
This is your safety net. Nothing gets permanently deleted until you've reviewed this folder.
Tip: Use a clearly named folder on your Desktop so it stays visible. You'll review it before emptying.
Step 2: Scan Your Source Folder
Open your duplicate finder tool and point it at the folder you want to clean. In PicDock:
- Add your source folder (e.g.,
~/Downloadsor a project directory) - Enable recursive scanning to include subfolders
- Wait for the initial scan to complete
Step 3: Sort and Filter
Once scanned, sort your images to surface duplicates:
- Sort by size: Exact duplicates have identical file sizes
- Sort by type: Group similar formats together
- Filter to duplicates only: If your tool supports it, show only flagged duplicates
Step 4: Review with Large Previews
Don't trust thumbnails alone. Before marking anything as a duplicate:
- View the full-size image
- Check the file details (dimensions, file size, date)
- If comparing two "duplicates," view them side-by-side
Warning: Similar-looking images aren't always duplicates. One might be higher resolution, one might have edits, one might be a different crop. Always verify before moving.
Step 5: Move Duplicates to Quarantine
Once you've confirmed a file is a duplicate:
- Select the duplicate (keep the original)
- Move it to your quarantine folder
- Repeat for all confirmed duplicates
In PicDock, you can set your quarantine folder as a "destination" and use the keyboard shortcut (K) to move files with one keystroke.
Step 6: Final Review and Delete
After processing, open your quarantine folder and do a final review:
- Scroll through to catch any mistakes
- Check that you still have the originals in their source locations
- When confident, move the quarantine folder to Trash
- Empty Trash only after a day or two (gives you time to recover if needed)
Exact Duplicates vs. Near-Duplicates
There are two types of duplicate detection:
Exact duplicates are byte-for-byte identical files. They have the same SHA-256 hash. These are safe to remove—you're literally keeping the same data.
Near-duplicates are visually similar but not identical. This includes:
- Same photo saved at different quality levels
- Screenshots with minor timestamp differences
- Images that have been slightly cropped or resized
- Photos taken in burst mode
Near-duplicate detection uses perceptual hashing (comparing visual features rather than raw bytes). It's useful but requires more careful review—the images aren't truly identical, so you need to decide which version to keep.
Learn more in our detailed guide: Exact vs Near-Duplicate Images: What's the Difference.
Frequently Asked Questions
Can I find duplicates without importing images into a library?
Yes. Tools like PicDock work directly with folders. You point them at a directory, they scan it, and you manage files in place. No import step, no library to maintain.
How do I avoid accidentally deleting the original?
Use the quarantine workflow described above. Never delete files directly from the source folder. Move suspected duplicates to a review folder first, verify you still have the original, then delete from quarantine.
Does this work offline? What about privacy?
PicDock processes everything locally on your Mac. No internet connection required, no images uploaded anywhere. Your files stay on your disk.
What image formats are supported?
Common formats like JPEG, PNG, HEIC, HEIF, WebP, TIFF, GIF, and BMP are all supported. This covers screenshots (PNG), iPhone photos (HEIC), design exports, and downloaded images.
Is there a free way to find duplicates?
For small-scale cleanup, Finder sorting and Quick Look work. For command-line users, fdupes is a free option. For a visual, folder-based workflow, PicDock's free tier lets you scan folders and detect duplicates with limited source folders.
What about duplicates across different folders?
If you want to find duplicates across multiple folders (e.g., Downloads AND Documents), you have two options:
- Scan a parent folder that contains both
- Use a tool that supports multiple source folders
How long does scanning take?
Initial scans depend on folder size. A folder with 1,000 images typically scans in seconds. Hash computation (for exact duplicate detection) runs in the background without blocking browsing.
Cleaning Up: A Practical Routine
Once you have a duplicate-finding workflow, consider making it a regular habit:
- Weekly: Scan Downloads folder, move duplicates to quarantine
- After projects: Clean up project asset folders when work is complete
- Quarterly: Deep scan of Documents and Desktop
The key is catching duplicates before they accumulate. A folder with 50 duplicates is manageable. A folder with 500 is a project.
Get Started
If you're tired of manually hunting for duplicates in Finder, give PicDock a try. It's built for exactly this workflow—scanning folders, finding duplicates, and organizing images without the friction of photo library apps.
Key features for duplicate management:
- Scan any folder, including subfolders recursively
- SHA-256 hash detection for exact duplicates
- Perceptual hash detection for near-duplicates
- Filter to show only duplicate images
- Keyboard-driven workflow for fast processing
- 100% local processing—your images never leave your Mac
Download PicDock on the App Store →
Related reading:
- How to Browse Thousands of Images Without Lag — Why performance matters in image browsers
- Why We Built PicDock — The developer workflow problem we set out to solve